React Redux
Welcome to the world of React Redux, a powerful combination that simplifies state management in React applications. React, a popular JavaScript library for building user interfaces, joins forces with Redux, a state management library, to provide an organized and efficient way to handle application state. In this introduction, you’ll embark on a journey to understand the core concepts of React Redux, including actions, reducers, the store, and middleware. Learn how to set up React Redux in your projects and connect React components to the Redux store. It’s a journey that promises better state management, reactivity, and organization in your React applications.
State management is the backbone of any dynamic application. It’s the system that keeps track of the data that an application relies on.
Importance of Managing State
Imagine you’re building a weather app. You need to store the user’s location, the chosen units (Celsius or Fahrenheit), and the retrieved weather data. This data is crucial for the app to work correctly and provide a seamless user experience. That’s where state management comes into play. It ensures that all this critical data is organized and accessible throughout the app. Without proper state management, your app becomes a chaotic mess of scattered data. Efficient state management not only makes your code cleaner and more maintainable but also enhances the user experience. It allows your app to respond quickly to user inputs and external changes.
Challenges in State Management
While state management is vital, it’s not without its challenges. Here are a few common obstacles:
- Complexity: As your app grows, so does the complexity of managing state. Different components may need access to the same data, and keeping it in sync can be challenging.
- Data Flow: Determining how data flows through your app is crucial. The unidirectional data flow is a popular approach, but it takes time to grasp and implement effectively.
- Asynchronous Operations: Fetching data from APIs or handling user interactions that trigger asynchronous operations can complicate state management. Ensuring that your app remains in a consistent state during these operations is a challenge.
- Performance: Inefficient state management can lead to performance issues. Unnecessary re-renders and slow response times can frustrate users.
- Testing: Writing tests for components that rely on complex state management can be daunting. It’s challenging to simulate various states and test different scenarios.
state management is a cornerstone of building robust and responsive applications. It ensures that data is well-organized and accessible, contributing to a seamless user experience. However, mastering state management isn’t without challenges, as complexity, data flow, asynchronous operations, performance, and testing all present problem.
What is React Redux?
React Redux is a critical library in the world of React, and it plays a pivotal role in state management. To understand what React Redux is, we need to break it down into its components and explore how it fits into the broader React ecosystem.
An Overview of React Redux
At its core, React Redux is a state management library for React applications. It provides a predictable and centralized way to handle your application’s state, making it indispensable for building large-scale and maintainable applications. React Redux builds upon the concepts of React and the state management library Redux to provide a seamless connection between your React components and the application’s state.
React Redux simplifies how components access and update the state, making your code cleaner and more maintainable. It does so by introducing the following key concepts:
- Store: The store is the centralized hub for your application’s state. It holds all the data and acts as a single source of truth. This ensures that data is consistent and accessible throughout the application.
- Actions: Actions are plain JavaScript objects that describe changes to the state. They are used to convey information about what should change and the data necessary to make that change.
- Reducers: Reducers are functions that specify how the application’s state changes in response to actions. They take the current state and an action as input and return a new state.
- Connect Function: The
connectfunction is provided by React Redux and is used to connect React components to the Redux store. It allows components to access state and dispatch actions.
How it Fits into the React Ecosystem
In the React ecosystem, components are responsible for rendering the user interface and handling user interactions. While components can have their internal state, they often need to access and modify shared data that resides outside of their own state. This is where React Redux comes into play.
React Redux acts as a bridge between your React components and the Redux store. It enables components to interact with the store and maintain a consistent application state. Here’s how it fits into the broader React ecosystem:
- React Components: React components are responsible for rendering the user interface and handling user interactions. They can be divided into two categories: presentational components and container components.
- Presentational Components: Presentational components are focused on how things look. They receive data via props and are concerned with the visual aspect of the application.
- Container Components: Container components are connected to the Redux store using the
connectfunction from React Redux. They are responsible for managing data and state-related logic. - Redux Store: The Redux store is the centralized hub for your application’s state. It holds all the data and provides it to container components. When actions are dispatched, the store updates and notifies connected components.
- Actions and Reducers: Actions describe changes to the state, while reducers specify how the state changes in response to those actions. These concepts are central to Redux and, by extension, React Redux.
React Redux enables the separation of concerns within your application. Presentational components focus on rendering the user interface, while container components handle data and state management. This clear separation makes your code more organized and easier to maintain.
Core Concepts of React Redux
Actions
Actions are the messengers of your application’s intent. They are plain JavaScript objects that describe what should change in your application’s state. When a user interacts with your application, actions are dispatched to notify the system about the desired modifications. These actions carry a type and, often, payload data.
For example, consider a to-do list application. When a user clicks the “Mark as Done” button for a task, an action is dispatched with a type of “MARK_AS_DONE” and a payload containing the task’s ID. Actions serve as a clear and consistent way to communicate changes throughout your application.
Reducers
Reducers are the decision-makers of your application. They specify how the application’s state should change in response to dispatched actions. Reducers are pure functions, which means they produce the same output for the same input and have no side effects. This predictability ensures a consistent state transition.
In our to-do list example, a reducer would take the current list of tasks, along with the “MARK_AS_DONE” action, and produce a new state where the specified task is marked as done. Reducers play a crucial role in maintaining a stable and predictable application state.
Store
The store is the keeper of your application’s state. It holds all the data that represents your application’s condition, and it acts as a single source of truth. This centralized state allows your components to access and update data consistently.
The store is a critical component of React Redux, and it ensures that your application maintains data integrity. When actions are dispatched, they flow through the store, and reducers update the state accordingly. The store provides a structured and organized way to manage your application’s data.
Middleware
Middleware is the gatekeeper of your application’s actions. It sits between the dispatching of an action and the moment it reaches the reducer. Middleware intercepts actions and can perform various tasks, such as logging, making asynchronous requests, or handling side effects.
Middleware enhances the capabilities of your application. For instance, Redux Thunk is a popular middleware that allows you to dispatch asynchronous actions. This is incredibly useful when your application needs to make API calls or handle operations that take time to complete.
React Redux’s core concepts work in harmony to provide a robust and organized way of managing your application’s state. Actions convey the intent of changes, reducers specify how the state should transition, the store acts as a centralized hub for data, and middleware adds flexibility and functionality to your application’s actions. Understanding and mastering these core concepts is the key to unlocking the full potential of React Redux in your projects.
Setting up React Redux is the initial step in harnessing its powerful state management capabilities. In this article, we will guide you through the process, starting with the installation of React Redux and creating a Redux store.
Installing React Redux
To get started with React Redux, you’ll need to install it in your project. You can do this easily using npm (Node Package Manager) or yarn, both of which are popular JavaScript package managers. Open your terminal and navigate to your project’s root directory.
Here’s the command to install React Redux using npm:
npm install react-reduxCode language: Bash (bash)And here’s the equivalent command using yarn:
yarn add react-reduxCode language: Bash (bash)This command will download React Redux and its dependencies, adding them to your project.
Creating a Redux Store
With React Redux installed, it’s time to create a Redux store. The store is the central hub that holds your application’s state and facilitates interactions with it. To create a store, you’ll need to write some code, but don’t worry—it’s relatively straightforward.
Let’s walk through the process step by step:
- Import Dependencies: Open your project’s main JavaScript file, typically named
index.jsorapp.js. At the top of the file, import the necessary dependencies:
   import React from 'react';
   import ReactDOM from 'react-dom';
   import { createStore } from 'redux';
   import { Provider } from 'react-redux';
   import rootReducer from './reducers'; // Import your reducers
import App from './App'; // Your main application componentCode language: HTML, XML (xml)- Create the Store: Next, create the Redux store by calling the
createStorefunction and passing your application’s root reducer as an argument. The root reducer is a combination of all your reducers.
const store = createStore(rootReducer);Code language: HTML, XML (xml)- Provider Component: To make the store available to your entire application, wrap your main component with the
Providercomponent. This component is provided by React Redux and ensures that your components can access the store.
   ReactDOM.render(
     <Provider store={store}>
       <App />
     </Provider>,
     document.getElementById('root')
   );Code language: HTML, XML (xml)
With these steps, you’ve successfully set up React Redux in your project. You’ve installed the necessary packages, created a Redux store, and made the store accessible to your application components.
It’s worth noting that this is a simplified example of setting up React Redux. In a real-world application, you’ll likely have multiple reducers, actions, and a more complex store configuration. However, the core process remains the same—import dependencies, create a store, and wrap your components with the Provider to connect them to the store.
By completing these steps, you’ve laid the foundation for state management in your React application. Your components can now access the store and interact with the application’s state, making it easier to handle data and application logic. As you delve deeper into React Redux, you’ll explore actions, reducers, and how to connect your components to the store for seamless state management.
Actions and Action Creators
Actions and action creators are the architects of state change in a React Redux application. They define what should happen when an event occurs, such as a user clicking a button. In this article, we’ll explore these fundamental concepts and how to wield them effectively.
Defining Actions
In the world of React Redux, actions are plain JavaScript objects that describe changes you want to make to your application’s state. These objects have two essential properties:
- Type: A string that identifies the type of action. This string is usually defined as a constant and shared among your application to ensure consistency. For example, you might have an action type like
'INCREMENT'for increasing a value. - Payload: Any data that provides additional information about the action. This can be a single value, an object, or even an array. The payload contains the details required to make the intended state change.
Here’s an example of a simple action that increments a counter:
{
  type: 'INCREMENT',
  payload: 1 // Increment by 1
}Code language: HTML, XML (xml)
The type property indicates that this action is of type 'INCREMENT', and the payload specifies that we should increment the counter by
Creating Action Creators
While defining actions is straightforward, creating action creators is a common practice to encapsulate the action-creation process. Action creators are functions that return action objects, making it more convenient to dispatch actions in your components.
Here’s a basic example of an action creator that creates an increment action:
function increment() {
  return {
    type: 'INCREMENT',
    payload: 1
  };
}Code language: JavaScript (javascript)
With this action creator in place, you can dispatch the increment action by calling it in your component. For example:
import { useDispatch } from 'react-redux';
import { increment } from './actions'; // Import your action creator

function Counter() {
  const dispatch = useDispatch();

  const handleIncrement = () => {
    dispatch(increment());
  }

  // Rest of your component code
}Code language: JavaScript (javascript)
Action creators provide a clear and reusable way to create actions. They are especially useful when an action’s payload requires dynamic data or complex calculations. Action creators can also help maintain a consistent structure for your actions, ensuring that they adhere to the expected format.
In more complex applications, you might have multiple actions and action creators, each responsible for different state changes. By organizing your actions and action creators effectively, you can maintain a well-structured and maintainable codebase.
In summary, actions and action creators are essential components in a React Redux application. Actions define what should change in the state, and action creators provide a convenient way to create and dispatch these actions. By mastering these concepts, you’ll be better equipped to handle state changes in your application and build robust and interactive user interfaces.
Reducers and the Redux Store
Writing Reducers
Reducers are JavaScript functions that specify how your application’s state should change in response to dispatched actions. They are the decision-makers of state transitions. Reducers take two arguments: the current state and an action. Based on the action’s type, they determine how the state should be updated.
Here’s a basic example of a reducer that handles an increment action:
function counterReducer(state = 0, action) {
  if (action.type === 'INCREMENT') {
    return state + action.payload;
  }
  return state;
}Code language: JavaScript (javascript)
In this reducer, the counterReducer function checks if the action type is 'INCREMENT'. If it is, the reducer increments the state by the action.payload value. If the action type doesn’t match, the reducer returns the current state unchanged.
Combining Reducers
In real-world applications, you typically have multiple pieces of state to manage, each with its reducer. Redux provides a utility function called combineReducers to bring these reducers together into one root reducer. This root reducer is then used to create the Redux store.
Here’s an example of combining reducers:
import { combineReducers, createStore } from 'redux';

// Reducers
function counterReducer(state = 0, action) {
  // Reducer logic for the counter
}

function userReducer(state = null, action) {
  // Reducer logic for user data
}

// Combine reducers into a root reducer
const rootReducer = combineReducers({
  counter: counterReducer,
  user: userReducer
});

// Create the Redux store with the root reducer
const store = createStore(rootReducer);Code language: JavaScript (javascript)
In this example, we have two reducers: counterReducer and userReducer. We use combineReducers to create a root reducer, which combines both of these reducers into one. The resulting rootReducer manages the state for both the counter and user data.
Managing State in the Redux Store
The Redux store is the central hub for your application’s state. It holds all the data that represents your application’s condition and acts as a single source of truth. To create a Redux store, you typically follow these steps:
- Import the necessary dependencies, including
createStorefrom Redux. - Create a root reducer using
combineReducersif you have multiple reducers. - Use the root reducer to create the Redux store.
Here’s a simplified example:
import { createStore, combineReducers } from 'redux';

// Reducers...
// Combine reducers into a root reducer...
// Create the Redux store with the root reducer...Code language: JavaScript (javascript)
Once the Redux store is created, it provides a centralized state accessible to your entire application. Components can connect to the store and access the state, and actions dispatched from components flow through the store to update the state as defined by your reducers.
By mastering reducers and understanding how to manage state in the Redux store, you’ll be well-equipped to handle state changes in your React Redux application. These core concepts are the foundation of effective state management, making your application more organized, maintainable, and predictable.
Connecting React Components
Connecting React components is at the heart of making React Redux a powerful tool for managing state in your applications. In this article, we’ll explore the key concepts of connecting components, including using the connect function, mapping state to props, and dispatching actions.
Using the connect Function
The connect function is a pivotal piece of the React Redux puzzle. It’s the bridge that connects your React components to the Redux store, allowing them to access and interact with the application’s state. Here’s how it works:
- Import
connect: First, you need to import theconnectfunction from thereact-reduxlibrary. This function will be used to wrap your React components. - Create a Connection: To connect a component, you wrap it with the
connectfunction. This is typically done when exporting your component. For example:
import { connect } from 'react-redux';

const ConnectedComponent = connect(mapStateToProps, mapDispatchToProps)(YourComponent);Code language: JavaScript (javascript)- Mapping State and Dispatch: The
mapStateToPropsandmapDispatchToPropsfunctions define how your component interacts with the Redux store.mapStateToPropsmaps a part of the store’s state to your component’s props, whilemapDispatchToPropsmaps Redux actions to your component’s props.
Mapping State to Props
Mapping state to props is a fundamental aspect of React Redux. It allows your components to access specific parts of the application’s state as props. Here’s how it’s done:
- Create
mapStateToProps: This function specifies which parts of the state are mapped to your component’s props. It takes the store’s state as an argument and returns an object with the desired mappings. For example:
const mapStateToProps = (state) => {
  return {
    user: state.user,
    todos: state.todos,
  };
};Code language: JavaScript (javascript)- Access State as Props: With
mapStateToPropsin place, your component can access the mapped state as props. For instance, if you’ve mapped theuserstate, you can use it in your component like this:
const { user } = this.props;Code language: JavaScript (javascript)Dispatching Actions
Dispatching actions is another key aspect of connecting React components. It allows your components to trigger changes in the application’s state. Here’s how it works:
- Create
mapDispatchToProps: This function defines which actions are mapped to your component’s props. It takes thedispatchfunction as an argument and returns an object with the desired mappings. For example:
const mapDispatchToProps = (dispatch) => {
  return {
    updateUser: (userData) => dispatch(updateUser(userData)),
    addTodo: (todoData) => dispatch(addTodo(todoData)),
  };
};Code language: JavaScript (javascript)- Dispatch Actions: With
mapDispatchToPropsin place, your component can dispatch actions by calling the mapped functions. For instance, if you’ve mapped theupdateUseraction, you can use it in your component like this:
this.props.updateUser(userData);Code language: JavaScript (javascript)connecting React components with React Redux is a powerful way to manage state in your applications. Using the connect function, you can bridge the gap between your components and the Redux store. Mapping state to props allows your components to access specific parts of the state, while dispatching actions empowers your components to trigger changes in the state. This combination streamlines your state management and enhances the reactivity of your application.
Middleware in React Redux
Middleware in React Redux is a powerful tool that enhances the capabilities of your state management.
What is Middleware?
Middleware, in the context of React Redux, is a way to intercept and process actions before they reach the reducers. It provides a mechanism for performing tasks such as logging, handling asynchronous operations, and modifying actions as they flow through your application. Middleware operates between the dispatching of an action and the time it reaches the reducer.
Here’s how middleware works:
- Action Dispatch: When you dispatch an action in your application, it travels through the middleware before reaching the reducer.
- Middleware Processing: Middleware can inspect, modify, or even block actions. For example, it can log action details, delay an action for a specific time, or make an asynchronous call before allowing the action to proceed.
- Action Reaching Reducer: After middleware processing, the action eventually reaches the reducer, where it updates the state based on the action’s type and payload.
Popular Middleware Options
React Redux provides a flexible middleware system, allowing you to choose from a variety of middleware options. Here are some of the popular middleware libraries:
- Redux Thunk: Redux Thunk is a widely used middleware for handling asynchronous actions in Redux. It enables you to dispatch functions as actions, making it easy to manage asynchronous operations like API calls. With Redux Thunk, you can keep your action creators simple and clean, delegating complex logic to these functions.
- Redux Saga: Redux Saga is another middleware for managing side effects in Redux. It uses generator functions to handle asynchronous operations, offering a more structured approach to dealing with complex asynchronous flows. Redux Saga is particularly useful for applications with intricate asynchronous requirements.
- Redux-Logger: Redux-Logger is a middleware that simplifies debugging in Redux. It logs every action and state change to the console, providing valuable insights into how your application’s state evolves. It’s a handy tool for identifying issues and understanding the flow of actions.
- Redux Promise Middleware: This middleware handles actions that return promises. It waits for the promise to resolve before dispatching the action, making it easy to work with asynchronous code. Redux Promise Middleware simplifies handling promises in Redux.
- Redux Persist: Redux Persist is a middleware for persisting your Redux store. It allows you to maintain the store’s state even after a page refresh or when the user navigates away from the application. This is particularly useful for applications that require user authentication or extensive form data.
- Custom Middleware: You can create your custom middleware to cater to specific application needs. Custom middleware offers full control over how actions are processed, making it a versatile option for tailored solutions.
middleware is a vital part of React Redux, providing a way to enhance your state management by intercepting and processing actions. It plays a crucial role in handling asynchronous operations, logging, and modifying actions as they pass through your application.
Asynchronous State Management
Handling asynchronous actions is a common requirement in modern web applications. Redux Thunk is a middleware that allows you to manage asynchronous operations seamlessly in your React Redux application.
Challenges of Handling Asynchronous Actions
In web development, asynchronous actions often involve tasks like making network requests to fetch data, interacting with APIs, or handling timeouts. These operations don’t complete instantaneously and can lead to issues when managing state in your application. Here are some common challenges:
- Race Conditions: When multiple asynchronous actions are in progress, they can create race conditions, leading to unpredictable behavior. For example, two actions might compete to modify the same piece of state.
- Complexity: Managing asynchronous actions can introduce complexity to your application’s code. Handling errors, retries, and parallel requests can become challenging.
- Callback Hell: Without the right tools, you might find yourself nesting callbacks within callbacks, resulting in a tangled and hard-to-maintain code.
- Testing Difficulties: Asynchronous code is often challenging to test. Traditional testing approaches may not work well for asynchronous actions.
Using Redux Thunk
Redux Thunk is a middleware for Redux that addresses these challenges by allowing you to dispatch functions as actions. These functions can contain asynchronous logic and can dispatch multiple actions during their execution. Here’s how Redux Thunk simplifies handling asynchronous actions:
- Dispatching Functions: With Redux Thunk, you can dispatch functions instead of plain objects as actions. These functions are known as “thunks.” Thunks can include asynchronous operations like API calls.
- Dispatching Multiple Actions: Thunks can dispatch multiple actions. This capability is especially valuable as it enables you to seamlessly update the state to signal the commencement of an operation, effectively manage the outcome or any potential errors during the operation, and maintain control over the loading state—all within a well-structured and easily anticipated framework.
- Middleware Execution: Moreover, Redux Thunk operates by processing thunks as middleware, granting the capability to actively engage with the Redux store, dispatch various actions, and proficiently manage asynchronous operations well in advance of their arrival at the reducers.
Here’s a basic example of using Redux Thunk to fetch data from an API:
import { fetchStart, fetchSuccess, fetchError } from './actions';

const fetchData = () => {
  return (dispatch) => {
    dispatch(fetchStart()); // Dispatch a start action to indicate the data fetch has begun.

    fetch('https://api.example.com/data')
      .then((response) => response.json())
      .then((data) => {
        dispatch(fetchSuccess(data)); // Dispatch a success action with the fetched data.
      })
      .catch((error) => {
        dispatch(fetchError(error)); // Dispatch an error action if the fetch encounters an error.
      });
  };
};Code language: JavaScript (javascript)
In this example, fetchData is a thunk that dispatches three actions: one to indicate the start of the data fetch, one to handle the success case, and one to handle errors.
Redux Thunk offers a structured approach to handling asynchronous actions, reducing complexity, preventing race conditions, and enhancing testability. It simplifies the management of asynchronous code, allowing you to focus on building robust and reliable web applications.
Common Risk and How to Avoid Them
Redux is a powerful state management library for JavaScript applications. While it offers numerous benefits, developers often encounter common pitfalls when using Redux.
Immutable State:
One of the fundamental principles of Redux is maintaining an immutable state. This means that once a state is created, it should not be directly modified. Instead, a new state should be created based on the previous state with the desired changes. Failing to follow this principle can lead to subtle bugs and unexpected behavior in your application.
To avoid issues related to mutable state, follow these best practices:
1. Use the Spread Operator: When updating state, employ the spread operator (…) to create shallow copies of objects and arrays. This ensures that you’re not altering the original state unintentionally.
// Incorrect: Mutating the state
state.todos.push(newTodo);

// Correct: Creating a new state object
return { ...state, todos: [...state.todos, newTodo] };Code language: JavaScript (javascript)
2. Immutability Libraries: Consider using libraries like Immer or seamless-immutable, which simplify the process of creating immutable updates to your state.
import produce from 'immer';

const newState = produce(state, (draftState) => {
  draftState.todos.push(newTodo);
});Code language: JavaScript (javascript)
3. Redux Toolkit: Utilize Redux Toolkit, an official package recommended by the Redux team. It includes utilities like createSlice that automatically handle immutability for you.
Overuse of Redux:
While Redux is excellent for managing global application state, overusing it can lead to unnecessary complexity and performance issues. It’s essential to strike a balance and determine when to employ Redux and when to rely on local component state.
To avoid the overuse of Redux, consider the following guidelines:
- Local Component State: Use local component state for managing UI-specific data that doesn’t need to be shared across the entire application. This simplifies your component and reduces the reliance on Redux.
- Think in Terms of “Is it Shared?”: Before adding a piece of state to Redux, ask yourself whether it needs to be shared across multiple components. If it’s specific to a single component or a few closely related components, it’s often better to keep it as local state.
- Use React Context: React Context is a powerful tool for sharing state within specific parts of your component tree. It can be a suitable alternative to Redux for some scenarios.
- Performance Considerations: Keep an eye on performance. Unnecessary use of Redux can impact your application’s performance. Ensure that you’re not causing unnecessary re-renders by connecting components to Redux when it’s not required.
understanding and adhering to the principle of immutable state is crucial when working with Redux. By following best practices and considering alternatives to Redux for local component state, you can maintain a healthy balance and prevent the overuse of Redux in your application. This will lead to a more efficient and maintainable codebase and help you avoid common pitfalls in Redux development.
Real-world Example: Building a Todo App
we’ll embark on a journey to build a real-world Todo app using React Redux. This practical example will walk you through the step-by-step development of the application while applying key React Redux concepts. By the end of this Example, you’ll have a solid grasp of how to integrate Redux into your React application and manage state efficiently.
Requirement
Before we dive into building our Todo app, make sure you have the following prerequisites in place:
- Node.js and npm: Ensure you have Node.js and npm (Node Package Manager) installed on your system. You can download them from the official website if you haven’t already.
- Basic understanding of React: Familiarity with React concepts like components, props, and state is essential.
- Code Editor: You’ll need a code editor of your choice. Visual Studio Code, Sublime Text, or any other editor will do.
Step 1: Setting Up Your Project
First, let’s create a new React project using Create React App, a popular tool for setting up React applications with a predefined folder structure and build configurations. Open your terminal and run the following command:
npx create-react-app todo-appCode language: Bash (bash)This command creates a new React project named “todo-app.” Once the setup is complete, navigate to the project directory:
cd todo-appCode language: Bash (bash)Step 2: Installing Redux and React Redux
In this step, we’ll install Redux and React Redux, which is the official library for integrating Redux with React. Run the following command to install these dependencies:
npm install redux react-reduxCode language: Bash (bash)Step 3: Creating the Redux Store
Now, let’s set up the Redux store for our application. In the “src” folder of your project, create a new file named “store.js.” This file will define our Redux store. Here’s the content of “store.js”:
import { createStore } from 'redux';
import rootReducer from './reducers';

const store = createStore(rootReducer);

export default store;Code language: JavaScript (javascript)
In this code, we import the createStore function from Redux and our root reducer from a file named “reducers.” We then create the Redux store and export it.
Step 4: Designing the Redux State
Before we build components and actions, let’s design the structure of our Redux state. In the “src” folder, create a folder named “reducers.” Inside this folder, create a file named “todos.js” to define the initial state and the logic for handling todos.
Here’s the content of “todos.js”:
const initialState = {
  todos: [],
};

const todosReducer = (state = initialState, action) => {
  switch (action.type) {
    case 'ADD_TODO':
      return {
        ...state,
        todos: [...state.todos, action.payload],
      };
    case 'REMOVE_TODO':
      return {
        ...state,
        todos: state.todos.filter((todo) => todo.id !== action.payload),
      };
    default:
      return state;
  }
};

export default todosReducer;Code language: HTML, XML (xml)
This reducer defines the initial state with an empty array of todos. It handles two actions: “ADD_TODO” and “REMOVE_TODO,” allowing us to add and remove todos.
Step 5: Creating Actions and Action Creators
In this step, we’ll define the actions and action creators for our Todo app. Create a new folder in the “src” directory named “actions.” Inside this folder, create a file named “todos.js” to define our actions and action creators.
Here’s the content of “todos.js”:
export const addTodo = (todo) => {
  return {
    type: 'ADD_TODO',
    payload: todo,
  };
};

export const removeTodo = (id) => {
  return {
    type: 'REMOVE_TODO',
    payload: id,
  };
};Code language: HTML, XML (xml)
These action creators allow us to dispatch “ADD_TODO” and “REMOVE_TODO” actions with the corresponding payloads.
Step 6: Building the Components
Now, let’s create the components for our Todo app. We’ll have a TodoList component to display the list of todos, and a TodoForm component to add new todos. Create these components in your “src” folder.
TodoList.js:
import React from 'react';
import { connect } from 'react-redux';
import { removeTodo } from './actions/todos';

const TodoList = ({ todos, removeTodo }) => {
  return (
    <ul>
      {todos.map((todo) => (
        <li key={todo.id}>
          {todo.text}
          <button onClick={() => removeTodo(todo.id)}>Remove</button>
        </li>
      ))}
    </ul>
  );
};

const mapStateToProps = (state) => ({
  todos: state.todos,
});

export default connect(mapStateToProps, { removeTodo })(TodoList);Code language: HTML, XML (xml)
TodoForm.js:
import React, { useState } from 'react';
import { connect } from 'react-redux';
import { addTodo } from './actions/todos';

const TodoForm = ({ addTodo }) => {
  const [text, setText] = useState('');

  const handleAddTodo = () => {
    if (text.trim() !== '') {
      addTodo({ text, id: Date.now() });
      setText('');
    }
  };

  return (
    <div>
      <input
        type="text"
        value={text}
        onChange={(e) => setText(e.target.value)}
        placeholder="Add a new todo"
      />
      <button onClick={handleAddTodo}>Add</button>
    </div>
  );
};

export default connect(null, { addTodo })(TodoForm);Code language: HTML, XML (xml)
Step 7: Integrating Redux in Components
We’ve created our components, but we need to integrate Redux. In “src/App.js,” wrap your components with the Provider component from React Redux to give them access to the Redux store:
import React from 'react';
import './App.css';
import { Provider } from 'react-redux';
import store from './store';
import TodoList from './TodoList';
import TodoForm from './TodoForm';

function App() {
  return (
    <Provider store={store}>
      <div className="App">
        <h1>Todo App</h1>
        <TodoList />
        <TodoForm />
      </div>
    </Provider>
  );
}

export default App;Code language: HTML, XML (xml)
Step 8: Running the App
You’ve now successfully built a Todo app with React Redux. To see it in action, start your development server by running:
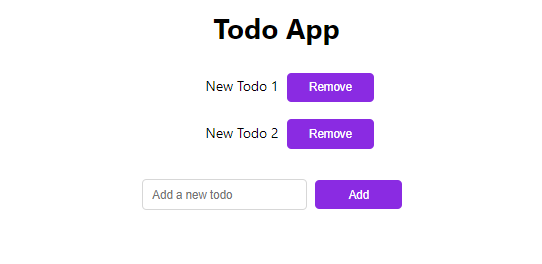
npm startCode language: Bash (bash)Open your browser and navigate to http://localhost:3000. You can add and remove todos, and the state management is handled seamlessly by Redux.
Step 9 : Output