JavaScript – DOM Tree
Introduction
The web as we know it today would be a very different place without the Document Object Model (DOM) tree. The DOM tree is the backbone of web development, a fundamental concept that underlies every website and web application. In this comprehensive guide, we’ll dive deep into the world of the DOM tree, demystifying its complexities and revealing its role in shaping the modern web.
What is the DOM Tree?
At its core, the DOM tree is a hierarchical representation of an HTML document. Think of it as a tree structure where every element in the HTML document is represented as a node. These nodes are connected to form a tree, with one node at the top called the “root” node.
Here’s a simple analogy: Imagine you have a family tree, starting with your grandparents at the top, branching down to your parents, then to you, your siblings, and so on. Each person in your family tree is like an HTML element in the DOM tree.
Constructing the DOM Tree
To better understand how the DOM tree is constructed, let’s consider an example. Suppose we have the following HTML code:
<!DOCTYPE html>
<html>
<head>
<title>My Web Page</title>
</head>
<body>
<h1>Welcome to My Website</h1>
<p>This is a paragraph of text.</p>
</body>
</html>Code language: HTML, XML (xml)Now, let’s break down how the DOM tree is built from this HTML:
Document (Root)
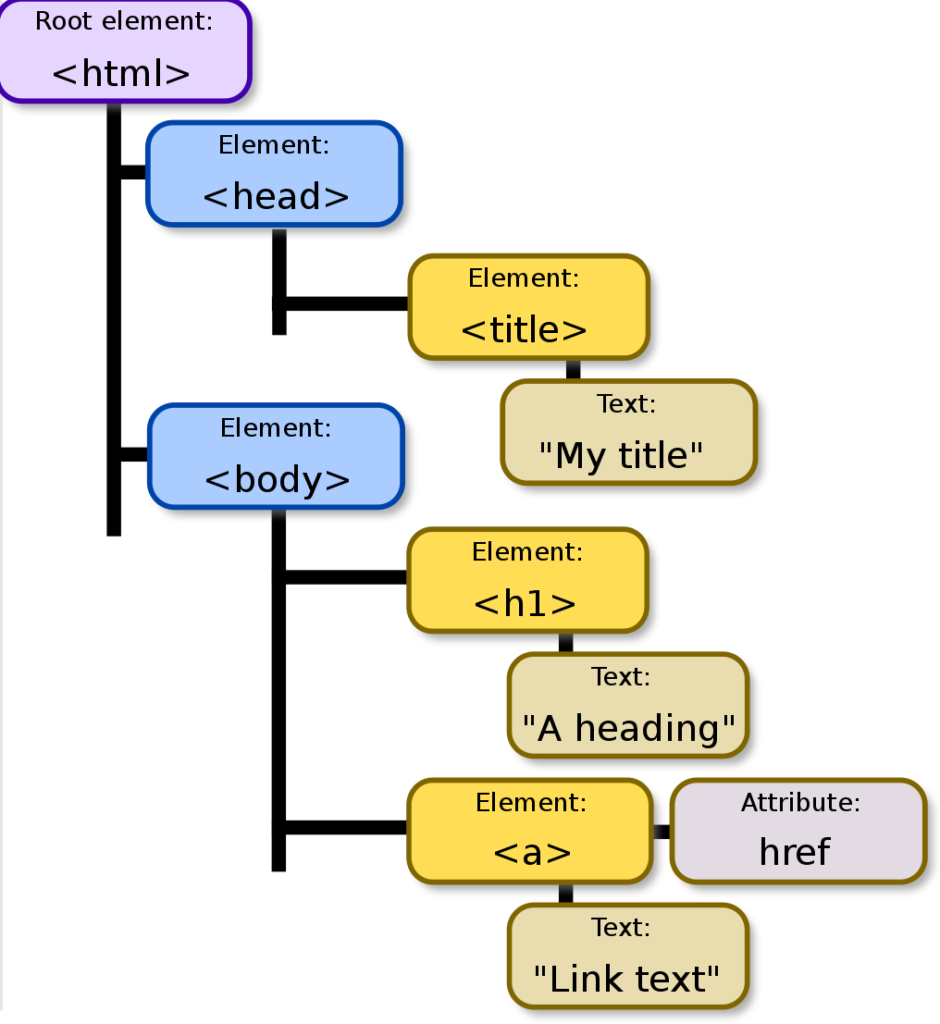
In this representation:
- The
<html>element is the root node. - The
<html>element has two children:<head>and<body>. - The
<head>element contains a single child, the<title>element. - The
<body>element has two children:<h1>and<p>. - Each text content within an element is represented as a “text node.”
Why Do We Need the DOM Tree?
The DOM tree is essential because it serves as a bridge between web content and JavaScript. It enables developers to:
- Access and Manipulate Content: With JavaScript, developers can access and modify the content of web pages. For instance, changing the text of a heading, updating an image, or retrieving user input from a form.
- Modify Structure: The DOM allows developers to dynamically add or remove elements on a web page. This flexibility enables the creation of interactive features like expanding menus, pop-up dialogs, and real-time updates.
- Respond to User Actions: The DOM enables developers to listen for user interactions, such as clicks, keyboard inputs, and mouse movements, and respond to them. This interactivity is crucial for web applications.
Traversing the DOM Tree
Traversing the DOM tree means moving from one node to another to access or manipulate elements. JavaScript provides several methods and properties for this purpose. Let’s look at a few examples:
1. Accessing Elements by ID:
document.getElementById() is a JavaScript method that plays a crucial role in web development. It allows you to access a specific element within the Document Object Model (DOM) of an HTML page by using its unique identifier, known as the “ID.”
In web development, each HTML element can have a special attribute called an “ID.” Think of it as a unique name or label for that element, much like a person’s name. The document.getElementById() method is like a search function that looks for a particular element using its unique ID.
For instance, let’s say you have an HTML page with various elements, and one of them is a <div> element with the ID “myDiv.” If you want to interact with or manipulate that specific <div> element using JavaScript, you can use document.getElementById("myDiv").
Here’s how you would typically use it:
const myElement = document.getElementById("myDiv");Code language: JavaScript (javascript)In this example, the myElement variable now contains a reference to the HTML element with the ID “myDiv.” You can then use this reference to do various things, such as changing its content, modifying its style, or responding to user interactions.
document.getElementById() is valuable when you need to target a particular element on a web page, especially if that element has a unique identifier. It simplifies the process of interacting with specific elements in the DOM, making your web development tasks more efficient and manageable.
2. Accessing Elements by Tag Name:
document.getElementByCallName is not a valid JavaScript method for selecting elements in the Document Object Model (DOM). In JavaScript, there is a similar method called document.getElementsByTagName. This method is used to select and access elements in the DOM based on their HTML tag name.
Here’s how document.getElementsByTagName works:
const elements = document.getElementsByTagName('tagname');Code language: JavaScript (javascript)- Replace
'tagname'with the HTML tag name of the elements you want to select (e.g., ‘p’ for paragraphs, ‘div’ for div elements, etc.). - This method returns a live HTMLCollection, which is similar to an array, containing all the elements with the specified tag name in the order they appear in the DOM.
For example, if you want to select all the <p> elements on a web page, you would use:
const paragraphs = document.getElementsByTagName('p');Code language: JavaScript (javascript)You can then access and manipulate these elements using JavaScript. This method is helpful when you want to apply changes or perform operations on multiple elements of the same type, such as styling, content manipulation, or event handling.
3. Accessing Elements by Class Name:
document.getElementsByClassName is a JavaScript method used to access and select multiple elements on a web page based on their class names. It allows you to work with elements that share a common class, which is a useful feature in web development for styling and functionality purposes.
Here’s how document.getElementsByClassName works:
- Selecting Elements by Class Name: You provide a class name as an argument to the method, and it returns a live HTMLCollection (a collection of elements) containing all the elements on the page that have that specific class name.
- Example: Suppose you have multiple elements with the class “highlighted” on your web page, and you want to select and manipulate them using JavaScript.
const highlightedElements = document.getElementsByClassName('highlighted');Code language: JavaScript (javascript)In this case, highlightedElements would contain all elements with the class “highlighted” in the order they appear in the DOM.
- Working with the Selected Elements: Once you have selected the elements, you can loop through the HTMLCollection or access individual elements by their index, just like you would with an array.
- Example: To change the text content of all elements with the “highlighted” class, you can do something like this:
   for (let i = 0; i < highlightedElements.length; i++) {
     highlightedElements[i].textContent = 'This is highlighted!';
   }Code language: JavaScript (javascript)
This code would update the text content of all elements with the class “highlighted” to “This is highlighted!”.
It’s worth noting that document.getElementsByClassName returns a live collection, which means if you add or remove elements with the specified class dynamically, the collection will automatically update to reflect those changes.
4. Querying Elements with CSS Selectors:
document.querySelector and document.querySelectorAll are two powerful methods in JavaScript used to select and access elements in the Document Object Model (DOM) of a web page.
1. document.querySelector: This method allows you to select the first element in the DOM that matches a specified CSS selector. It returns a single element or null if no matching element is found. Here’s how it works:
Example : Selecting an element by its ID.
const elementById = document.querySelector('#myElementId');
Code language: JavaScript (javascript)
In this case, it would select the element with the ID “myElementId.”
2. document.querySelectorAll: This method allows you to select all elements in the DOM that match a specified CSS selector. It returns a NodeList (a collection of elements) even if only one element matches the selector. Here’s how it works:
Example : Selecting all elements with a specific class.
const elementsWithClass = document.querySelectorAll('.highlighted');
Code language: JavaScript (javascript)
It would return a NodeList containing all elements with the class “highlighted.”
Both of these methods are widely used in web development to interact with elements on a web page. They allow you to dynamically access and manipulate elements based on their attributes, relationships, or other criteria defined by CSS selectors. Whether you’re updating the content, style, or behavior of elements, document.querySelector and document.querySelectorAll are essential tools for working with the DOM in JavaScript.
Once you’ve accessed an element, you can manipulate it or read its properties, such as changing its content or style.
Modifying the DOM with JavaScript
JavaScript empowers you to make dynamic changes to web pages by manipulating the DOM tree. Let’s explore a few common tasks:
Changing Text Content:
const heading = document.querySelector("h1");
heading.textContent = "Hello, DOM!";Code language: JavaScript (javascript)
Adding Elements:
const newParagraph = document.createElement("p");
newParagraph.textContent = "This is a new paragraph.";
document.body.appendChild(newParagraph);Code language: JavaScript (javascript)
Removing Elements:
const paragraphToRemove = document.querySelector("p");
paragraphToRemove.remove();Code language: JavaScript (javascript)
Changing Styles:
const button = document.querySelector("button");
button.style.backgroundColor = "blue";
button.style.color = "white";Code language: JavaScript (javascript)
Handling Events:
const button = document.querySelector("button");
button.addEventListener("click", function () {
    alert("Button clicked!");
});Code language: JavaScript (javascript)
These examples demonstrate the power of JavaScript in dynamically altering web page content and behavior.
Cross-Browser Compatibility
While the DOM provides a consistent way to interact with web content, different web browsers may implement it slightly differently. To ensure your web applications work across various browsers, it’s essential to test and consider cross-browser compatibility. Tools like Babel and polyfills can help address compatibility issues.
Conclusion
The DOM tree, with its hierarchical structure, is at the heart of web development. It empowers developers to create interactive, dynamic, and responsive web applications. Understanding how to navigate and manipulate the DOM is a fundamental skill for web developers. As you delve deeper into web development, you’ll come to appreciate the DOM’s role in shaping the modern web, making user experiences more engaging and interactive. So, welcome to the world of web development, where the DOM tree is your trusty companion on your journey to crafting fantastic web applications.
Related posts:

Powered by YARPP.