Class and ID Selector
Class Selector :
Certainly! Class selectors are an essential part of CSS that allow web designers and developers to apply styles to specific HTML elements based on their assigned class attributes. These selectors provide a way to target and style multiple elements with the same class, regardless of their tag names. Here’s a human-centered explanation of class selectors in CSS:
Purpose of Class Selectors:
Class selectors are used to group and style elements that share a common purpose or design. They enable you to apply consistent styles to multiple elements throughout a webpage without relying solely on element names or IDs.
Syntax of Class Selectors:
Class selectors begin with a dot . followed by the class name. For example, to create a class selector named “highlight,” you would write .highlight in your CSS code.
HTML Usage:
In HTML, you assign class attributes to elements by including the class attribute within the opening tag of the element. For instance, to apply the “highlight” class to a paragraph, you would write <p class="highlight">...</p>.
CSS Application:
In your CSS stylesheet, you can define the styles for the class selector. For instance, you might specify that elements with the “highlight” class should have a background color of yellow and bold text. Here’s an example:
.highlight {
background-color: yellow;
font-weight: bold;
}Code language: CSS (css)Multiple Classes:
You can apply multiple classes to a single element, allowing you to combine styles. For instance, you can have an element with both a “highlight” class and a “text-large” class, applying the styles associated with both classes.
Class Naming Convention:
It’s a good practice to choose meaningful and descriptive class names that reflect the purpose of the styling rather than generic names. This makes your code more readable and maintainable.
Benefits of Class Selectors:
- Reusability: Class selectors enable you to reuse styles across various elements, promoting code efficiency.
- Separation of Concerns: They adhere to the principle of separating content from presentation, enhancing code maintainability.
- Flexibility: Class selectors allow for granular control over styling, making it easy to create unique designs for specific elements.
- Collaboration: Multiple developers can work on the same project without conflicting styles by using class selectors to isolate styling rules.
In essence, class selectors in CSS empower web designers to create cohesive and consistent styles across different elements, making it a fundamental tool for crafting well-designed and visually appealing websites.
Example :
Imagine you’re designing a webpage for a restaurant menu. You want to style various sections of the menu items differently, such as highlighting special dishes or indicating spicy items. Class selectors can help you achieve this. Let’s look at some code:
<!DOCTYPE html>
<html>
<head>
    <title>Restaurant Menu</title>
    <style>
        /* Class Selectors Example */
        * {
            margin: 0 auto;
        }
        .container{
            width: 300px;
        }
        .special-dish {
            background-color: #FFD700;
            /* Gold background for special dishes */
            font-weight: bold;
        }

        .spicy {
            color: #FF6347;
            /* Tomato red text for spicy items */
        }
    </style>
</head>
<body>
    <div class="container">
        <h1>Our Menu</h1>
        <h2>Appetizers</h2>
        <ul>
            <li class="special-dish">Garlic Parmesan Wings</li>
            <li>Mozzarella Sticks</li>
            <li class="spicy special-dish">Firecracker Shrimp</li>
        </ul>
        <h2>Main Courses</h2>
        <ul>
            <li>Classic Burger</li>
            <li class="spicy">Spicy Chicken Sandwich</li>
            <li class="special-dish">Filet Mignon</li>
        </ul>
    </div>
</body>
</html>Code language: HTML, XML (xml)
Output :

In this example:
- We’ve defined two class selectors:
.special-dishand.spicy. - The
.special-dishclass selector sets a gold background and bold text for elements with this class. - The
.spicyclass selector changes the text color to tomato red for elements with this class. - In our HTML, we’ve applied these class selectors to specific menu items using the
classattribute. - Menu items marked with the
.special-dishclass have a gold background and bold text to make them stand out as special dishes. - Items labeled with the
.spicyclass are indicated with tomato red text to alert customers to their spiciness.
Using class selectors in this way allows you to create an attractive and informative restaurant menu, ensuring that special dishes and spicy items are visually distinguished for customers, enhancing their dining experience.
ID Selector :
Certainly! An ID selector in CSS is used to target a specific HTML element based on its unique ID attribute. Each ID should be unique within a web page, making it an ideal way to style a single, specific element. Here’s a human-friendly explanation with an example:
Purpose of ID Selectors:
ID selectors are designed for singling out and styling a unique HTML element within a web page. They are used when you want to apply styles to just one specific element, and no other element should share the same ID.
Syntax of ID Selectors:
An ID selector begins with a hash # followed by the ID name. For example, if you have an element with the ID attribute set to “my-element,” you can create an ID selector by writing #my-element in your CSS.
HTML Usage:
In HTML, you assign an ID to an element by using the id attribute within the opening tag of the element. For instance, to apply an ID of “my-element” to a <div>, you would write <div id="my-element">...</div>.
CSS Application:
In your CSS stylesheet, you can define the styles for the ID selector. The styles you specify will only apply to the element with that specific ID. Here’s an example:
#my-element {
  background-color: lightblue;
  font-size: 18px;
  text-align: center;
}Code language: CSS (css)
Benefits of ID Selectors:
- Uniqueness: IDs are unique, ensuring that styles are only applied to a single element, which can be useful for distinctive elements like headers or footers.
- Specificity: ID selectors have high specificity in CSS, which means their styles take precedence over other selectors, like class selectors or tag selectors.
- Ease of Targeting: When you have a specific element that requires unique styling, using an ID selector is a clear and efficient way to achieve that.
Example:
Here’s an example of an ID selector in action:
<!DOCTYPE html>
<html>
<head>
    <title>ID Selector Example</title>
    <style>
        /* ID Selector Example */
        *{
            margin: 20px auto;
        }
        .container{
            width: 300px;
        }
        #unique-heading {
            background-color: lightblue;
            font-size: 24px;
            text-align: center;
        }
    </style>
</head>
<body>
    <div class="container">
        <h1 id="unique-heading">Welcome to My Website</h1>
        <p>This is some regular content on the page.</p>
    </div>
</body>
</html>Code language: HTML, XML (xml)
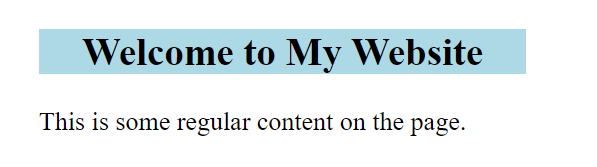
Output :
In this example :
* { margin: 20px auto; }: This CSS rule applies to all elements (*) on the page. It sets a margin of 20 pixels on top and bottom and automatically centers elements horizontally using theautovalue..container { width: 300px; }: This rule targets elements with the class “container” and sets their width to 300 pixels.#unique-heading { background-color: lightblue; font-size: 24px; text-align: center; }: This rule targets the element with the ID “unique-heading,” which is an<h1>element. It gives it a light blue background, a font size of 24 pixels, and centers the text.
we’ve applied the ID selector #unique-heading to the <h1> element, giving it a distinct background color, larger font size, and centered text alignment. This unique styling is only applied to the element with the specified ID, making it stand out on the web page.
