---
title: "HTML – Forms"
url: https://khanwaseem.com/blog/course/html-forms
author: "khan Waseem"
published: 2023-09-21
updated: 2023-09-25
topics: ["course", "HTML Tutorial"]
description: "Learn how to create interactive web forms with HTML. Explore form elements, validation, and submission methods to enhance user interaction on your website.”"
---
# HTML – Forms
An HTML form is like a virtual paper or digital document that you can fill out on a website. It’s a way for you to input information and send it to a web server. Think of it like a survey or a contact page on a website.
In a form, you typically see various fields where you can type or select information. For example, you might see text boxes to enter your name, email address, or a message. There could also be checkboxes for you to select options, like “Yes” or “No,” and radio buttons for choosing one option from a list.
Table of Contents
[Toggle](#)
- [ Element :](#element)[ Element :](#element-2)
- [ Tag :](#tag)
- [Name Attribute for :](#name-attribute-for)
- [ Element :](#element-3)
## Element :
The HTML `Code language: HTML, XML (xml)
```
**Exmaple : **
```xml
Code language: HTML, XML (xml)
```
**Output : **
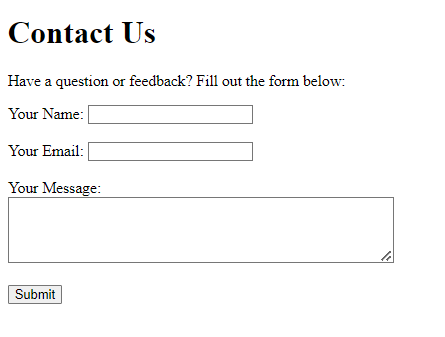
In this example, we have a simple web page for contacting a website. It includes:
- A heading (`****`) indicating the purpose of the page.
- A brief message inviting the user to fill out the form.
- A `<**form**>` element that defines the form. It has an **`action` **attribute, which specifies where the form data will be sent when submitted (in this case, to a hypothetical “submit.php” script), and a `method` attribute, which specifies how the data will be sent (using the POST method).
- Inside the form, there are several form elements:
Labels (`****`) are used to describe what each input field is for.
- Text input fields (`****`) for the user’s message.
- Finally, a “Submit” button (`**<input type="submit">**`) to submit the form.
### Element :
The `<label>` element in HTML is used to create a label for an input element, such as a text field, radio button, checkbox, or other form elements. It provides a descriptive text or caption for the associated input element, making it clear to users what the input is for. Here’s a human-friendly explanation of how to use the `<label>` element:
Imagine you’re creating a form on a website where users need to enter their name. You would use the `<label>` element to add a label or a text description next to the input field, like this:
```xml
<label for="name">Your Name:</label>
<input type="text" id="name" name="name" placeholder="Enter your name">
Code language: HTML, XML (xml)
```
In this example:
- The `<label>` element contains the text “Your Name:”, which acts as a label for the input field.
- The `for` attribute in the `<label>` element is set to “name,” which should match the `id` attribute of the associated input field. This association helps screen readers and improves accessibility, as it tells them which label corresponds to which input.
- The `<input>` element is where users can enter their name.
By using `<label>`, you make the form more user-friendly because it provides context and guidance to users, especially those who may be using screen readers or other assistive technologies. It also allows users to click on the label to focus on the associated input field, making it easier to interact with forms on your website.
### Tag :
The `**<select>**` tag in HTML is used to create a dropdown list or a selection box on a web page. It allows users to choose from a list of options by clicking on a dropdown arrow and selecting one item from the list. This tag is an essential part of creating interactive and user-friendly forms on websites.
Here’s a simple example of how the `**<select>**` tag is used in HTML:
```xml
<label for="fruit">Select your favorite fruit:</label>
<select id="fruit" name="fruit">
<option value="apple">Apple</option>
<option value="banana">Banana</option>
<option value="orange">Orange</option>
<option value="strawberry">Strawberry</option>
<option value="grape">Grape</option>
</select>Code language: HTML, XML (xml)
```
**Output : **
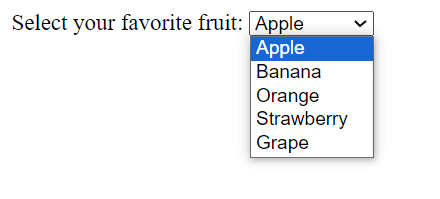
In this example, we have created a dropdown list of fruit options. The `**<label>**` tag provides a description for the dropdown, making it more accessible. The `**<select>**` tag contains a set of `**<option>**` tags, each representing a different fruit. Users can click on the dropdown arrow, see the list of options, and select their favorite fruit.
The **`id` **attribute is used for associating the `**<label>**` with the `**<select>**` element, and the **`name` **attribute specifies the name of the form field when the form is submitted.
Overall, the `**<select>**` tag is a valuable HTML element for creating interactive and user-friendly forms and interfaces on websites.
### Name Attribute for :
In HTML, the **`name` **attribute for the `**<input>**` element is used to give a name or identifier to the input field. This attribute plays a crucial role when submitting a form on a web page. Here’s a human-friendly explanation of how the **`name` **attribute works:
Think of the **`name` **attribute as a way to label or tag each input field within a form. It’s like assigning a unique name to each field so that when a user submits the form, the data entered into each field can be organized and identified on the server.
For example, if you have a form that collects information about a user, you might have fields for their name, email, and phone number. You would use the **`name` **attribute to name each of these fields:
```xml
<form>
<label for="name">Name:</label>
<input type="text" id="name" name="user_name"><br><br>
<label for="email">Email:</label>
<input type="email" id="email" name="user_email"><br><br>
<label for="phone">Phone Number:</label>
<input type="tel" id="phone" name="user_phone"><br><br>
<input type="submit" value="Submit">
</form>
Code language: HTML, XML (xml)
```
In this example:
- The **`name` **attribute is used to uniquely identify each input field. For instance, `**name="user_name"**` is assigned to the name input field.
- When the user submits the form, the server will receive data with these names attached, allowing it to process and store the information correctly. This is especially important when handling data on the server side or when using server-side scripts like PHP or Python.
So, in essence, the **`name` **attribute helps establish a connection between the input fields and the server, ensuring that the data entered by users can be managed effectively. It’s a fundamental part of HTML forms, enabling the handling of user data on the web.
### Element :
The `<input>` element in HTML comes with various types that determine what kind of user input it accepts. Here are some common types of the `<input>` element and their descriptions:
**1. Text Input (`type="text"`):** This type is used for accepting single-line text input from users. It’s suitable for fields like names, addresses, or short comments.
```xml
<input type="text" id="username" name="username" placeholder="Enter your username" required>Code language: HTML, XML (xml)
```
**2. Password Input (`type="password"`):** This type is designed for securely collecting passwords. Characters entered in this field are typically obscured (displayed as asterisks or dots) to protect the user’s privacy.
```xml
<input type="password" id="password" name="password" placeholder="Enter your password" required>Code language: HTML, XML (xml)
```
**3. Email Input (`type="email"`):** This type is used to collect email addresses. It includes built-in validation to ensure that the entered text follows the format of an email address.
```xml
<input type="email" id="email" name="email" placeholder="Enter your email" required>Code language: HTML, XML (xml)
```
**4. Number Input (`type="number"`):** This type is used to gather numeric input, such as age or quantity. It includes controls for incrementing or decrementing the value, and you can set minimum and maximum values.
```xml
<input type="number" id="quantity" name="quantity" min="1" max="100" value="1">Code language: HTML, XML (xml)
```
**5. Date Input (`type="date"`):** This type allows users to select a date from a calendar or enter it manually. It’s commonly used for birthdate or appointment scheduling.
```xml
<input type="date" id="birthdate" name="birthdate">Code language: HTML, XML (xml)
```
**6. Time Input (`type="time"`):** Similar to the date input, this type is used for collecting times. Users can select a time from a dropdown or enter it manually.
```xml
<input type="time" name="time" id="time">Code language: HTML, XML (xml)
```
**7. Checkbox Input (`type="checkbox"`):** Checkboxes are used when users need to select one or more options from a list of choices. Each checkbox represents a single option, and users can check or uncheck them.
```xml
<input type="checkbox" id="subscribe" name="subscribe" value="yes">Code language: HTML, XML (xml)
```
**8. Radio Button Input (`type="radio"`):** Radio buttons are used when users need to select one option from a list of choices. Unlike checkboxes, users can select only one radio button within a group.
```xml
<input type="radio" id="male" name="gender" value="male">
<input type="radio" id="female" name="gender" value="female">Code language: HTML, XML (xml)
```
**9. File Input (`type="file"`):** This type allows users to upload files, such as images, documents, or videos, to a web server. It opens a file selection dialog when clicked.
**10. Submit Button (`type="submit"`):** This is not an input for user input but a button used to submit the form to the server once all required data is filled out. It triggers the form submission process.
These are some of the most commonly used input types in HTML forms. Each type is designed for specific types of data, making it easier for users to provide the required information in a user-friendly way.
Here’s an HTML document that includes examples of all the `<input>` elements with different types:
```xml
<!DOCTYPE html>
<html>
<head>
<title>Input Examples</title>
</head>
<body>
<h1>Input Element Examples</h1>
<!-- Text Input -->
<label for="username">Username:</label>
<input type="text" id="username" name="username" placeholder="Enter your username" required>
<br><br>
<!-- Password Input -->
<label for="password">Password:</label>
<input type="password" id="password" name="password" placeholder="Enter your password" required>
<br><br>
<!-- Email Input -->
<label for="email">Email:</label>
<input type="email" id="email" name="email" placeholder="Enter your email" required>
<br><br>
<!-- Number Input -->
<label for="quantity">Quantity:</label>
<input type="number" id="quantity" name="quantity" min="1" max="100" value="1">
<br><br>
<!-- Date Input -->
<label for="birthdate">Birthdate:</label>
<input type="date" id="birthdate" name="birthdate">
<br><br>
<!-- Radio Buttons -->
<label>Gender:</label>
<input type="radio" id="male" name="gender" value="male">
<label for="male">Male</label>
<input type="radio" id="female" name="gender" value="female">
<label for="female">Female</label>
<br><br>
<!-- Checkboxes -->
<label for="subscribe">Subscribe to Newsletter:</label>
<input type="checkbox" id="subscribe" name="subscribe" value="yes">
<br><br>
<!-- File Upload -->
<label for="avatar">Choose your avatar:</label>
<input type="file" id="avatar" name="avatar">
<br><br>
<!-- Submit Button -->
<input type="submit" value="Submit">
</body>
</html>
Code language: HTML, XML (xml)
```
**Output : **
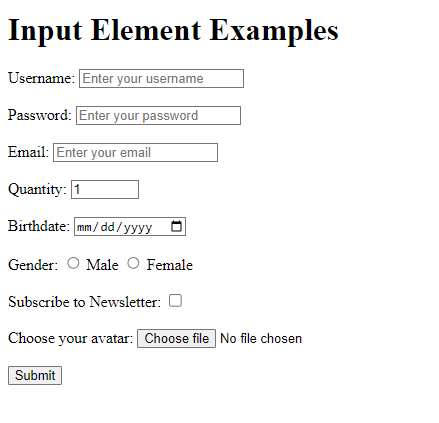
In this HTML document, you’ll find examples of various `**<input>**` types, including text input, password input, email input, number input, date input, radio buttons, checkboxes, file upload, and a submit button. Each input type is labeled for clarity, and some have additional attributes like `**min**`, `**max**`, and **`placeholder` **to provide specific functionality or hints to the user.
### Related posts:
[HTML – Attributes](https://blog.khanwaseem.com/html-attributes/)
[JavaScript – Form](https://blog.khanwaseem.com/javascript-form-validation/)
[JavaScript-Form properties and methods](https://blog.khanwaseem.com/javascript-form-properties-and-methods/)
[React Form](https://blog.khanwaseem.com/react-form/)
Powered by [YARPP](https://yarpp.com).