---
title: "CSS – Pseudo Elements"
url: https://khanwaseem.com/blog/course/css-pseudo-elements
author: "khan Waseem"
published: 2023-09-18
updated: 2023-09-18
topics: ["course", "CSS Tutorial"]
description: "CSS pseudo-elements: Enhance web design by styling specific parts of elements or generating dynamic content, without altering HTML structure"
---

# CSS – Pseudo Elements

In CSS, “pseudo-elements” are a powerful feature that allows you to select and style parts of an element’s content or generate additional content dynamically. Pseudo-elements start with a double colon (::) and provide a way to apply styles to specific parts of an element without adding extra HTML markup.

**Here are some common pseudo-elements and their purposes:**

**1. ::before:** This pseudo-element allows you to insert content before the content of an element. It’s often used for decorative elements or icons before text.

**Example : **

Certainly! Here’s an example of how to use the `::before` pseudo-element in HTML and CSS to add content before an element:

```xml
<!DOCTYPE html>
<html>
<head>
    <style>
        body{padding:10%}
        /* CSS styles for the container */
        .container {
            width: 200px;
            height: 100px;
            background-color: #336699;
            color: white;
            text-align: center;
            line-height: 100px;
            position: relative;
        }

        /* Style the ::before pseudo-element */
        .container::before {
            content: "Before Content"; /* Content to be inserted before the element */
            background-color: #ff6600;
            position: absolute;
            top: 0;
            left: -50%; /* Move it to the left by 50% of its own width */
            width: 50%; /* Set its width to 50% of the parent container */
            height: 100%;
            text-align: center;
            line-height: 100px;
        }
    </style>
</head>
<body>
    <h2>::before Example</h2>
    <div class="container">Main Content</div>
</body>
</html>Code language: HTML, XML (xml)
```

**Output : **
![](https://blogkhanwaseem.s3.amazonaws.com/uploads/2023/09/18115828/image-131.png)

**In this example:**

- We have a `<div>` element with the class `.container` that serves as the main content container.

- In the CSS, we set the default styles for the container, including its dimensions, background color, text color, and alignment.

- We use the `.container::before` pseudo-element to insert content before the container. The `content` property specifies the text that will be inserted before the element.

- The `position` property is set to `absolute`, allowing us to position the `::before` content relative to the container.

- We use `top: 0` to position the content at the top of the container and `left: -50%` to move it to the left by 50% of its own width.

- The `width` property is set to `50%`, making the `::before` content half the width of the parent container.

When you open this HTML file in a web browser, you will see that the `::before` pseudo-element inserts content before the main container, creating a visual effect. This demonstrates how to use `::before` to add content before an HTML element and style it as desired.

**2. ::after:** Similar to “::before,” this pseudo-element inserts content after the content of an element. It’s useful for adding content, such as tooltips or additional information.

**Example : **

Certainly! Here’s an example of how to use the `::after` pseudo-element in HTML and CSS to add content after an element:

```xml
<!DOCTYPE html>
<html>
<head>
    <style>
        /* CSS styles for the container */
        .container {
            width: 200px;
            height: 100px;
            background-color: #336699;
            color: white;
            text-align: center;
            line-height: 100px;
            position: relative;
        }

        /* Style the ::after pseudo-element */
        .container::after {
            content: "After Content"; /* Content to be inserted after the element */
            background-color: #ff6600;
            position: absolute;
            top: 0;
            right: -50%; /* Move it to the right by 50% of its own width */
            width: 50%; /* Set its width to 50% of the parent container */
            height: 100%;
            text-align: center;
            line-height: 100px;
        }
    </style>
</head>
<body>
    <h2>::after Example</h2>
    <div class="container">Main Content</div>
</body>
</html>Code language: HTML, XML (xml)
```

**Output : **
![](https://blogkhanwaseem.s3.amazonaws.com/uploads/2023/09/18120408/image-132.png)

**In this example:**

- We have a `<div>` element with the class `.container` that serves as the main content container.

- In the CSS, we set the default styles for the container, including its dimensions, background color, text color, and alignment.

- We use the `.container::after` pseudo-element to insert content after the container. The `content` property specifies the text that will be inserted after the element.

- The `position` property is set to `absolute`, allowing us to position the `::after` content relative to the container.

- We use `top: 0` to position the content at the top of the container and `right: -50%` to move it to the right by 50% of its own width.

- The `width` property is set to `50%`, making the `::after` content half the width of the parent container.

When you open this HTML file in a web browser, you will see that the `::after` pseudo-element inserts content after the main container, creating a visual effect. This demonstrates how to use `::after` to add content after an HTML element and style it as desired.

**3. ::first-line:** It selects the first line of text within an element. You can style the first line differently, adjusting font properties or text decoration.

**Example : **

The `::first-line` pseudo-element is used to style the first line of text within an element. Here’s an example of how to use `::first-line` in HTML and CSS:

```xml
<!DOCTYPE html>
<html>
<head>
    <style>
        /* CSS styles for the paragraph */
        p {
            width: 300px;
            background-color: #336699;
            color: white;
            padding: 10px;
            font-size: 16px;
        }

        /* Apply styles to the first line of the paragraph */
        p::first-line {
            font-weight: bold; /* Make the first line bold */
            font-size: 18px; /* Increase the font size of the first line */
            text-transform: uppercase; /* Convert the first line to uppercase */
        }
    </style>
</head>
<body>
    <h2>::first-line Example</h2>
    <p>This is an example paragraph. Only the first line of this paragraph will have special styles applied using the ::first-line pseudo-element. The rest of the text will remain in its default style.</p>
</body>
</html>Code language: HTML, XML (xml)
```

**Output : **
![](https://blogkhanwaseem.s3.amazonaws.com/uploads/2023/09/18120625/image-133.png)

**In this example:**

- We have a `<p>` element that contains a paragraph of text.

- In the CSS, we set the default styles for the paragraph, including its dimensions, background color, text color, padding, and font size.

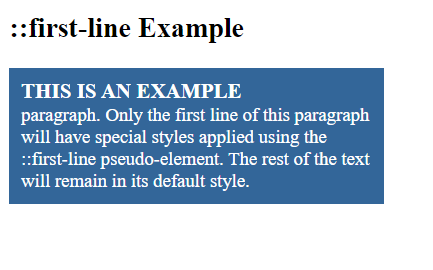
- We use the `p::first-line` selector to apply styles to the first line of the paragraph. In this case, we make the first line bold, increase its font size, and convert it to uppercase.

When you open this HTML file in a web browser, you will see that only the first line of the paragraph has special styles applied using the `::first-line` pseudo-element, while the rest of the text remains in its default style. This demonstrates how to use `::first-line` to style the first line of text within an element.

**4. ::first-letter:** This pseudo-element selects the first letter or initial character of a text element. It’s commonly used for drop caps or special styling of the first letter in a paragraph.

**Example : **

The `::first-letter` pseudo-element is used to style the first letter of a block-level element. Here’s an example of how to use `::first-letter` in HTML and CSS:

```xml
<!DOCTYPE html>
<html>
<head>
    <style>
        /* CSS styles for the paragraph */
        p {
            width: 300px;
            background-color: #336699;
            color: white;
            padding: 10px;
            font-size: 16px;
        }

        /* Apply styles to the first letter of the paragraph */
        p::first-letter {
            font-size: 36px; /* Increase the font size of the first letter */
            font-weight: bold; /* Make the first letter bold */
            color: #ff6600; /* Change the color of the first letter */
            float: left; /* Float the first letter to the left */
            margin-right: 5px; /* Add some spacing to the right of the first letter */
        }
    </style>
</head>
<body>
    <h2>::first-letter Example</h2>
    <p>This is an example paragraph. The first letter of this paragraph will have special styles applied using the ::first-letter pseudo-element. The rest of the text will remain in its default style.</p>
</body>
</html>Code language: HTML, XML (xml)
```

**Output : **

![](https://blogkhanwaseem.s3.amazonaws.com/uploads/2023/09/18121144/image-134.png)

**In this example:**

- We have a `<p>` element that contains a paragraph of text.

- In the CSS, we set the default styles for the paragraph, including its dimensions, background color, text color, padding, and font size.

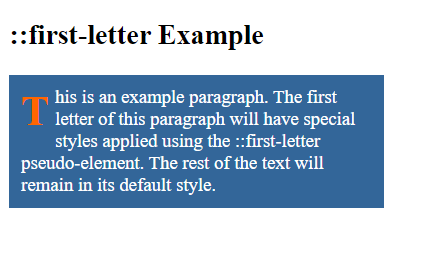
- We use the `p::first-letter` selector to apply styles to the first letter of the paragraph. In this case, we increase the font size, make the first letter bold, change its color, float it to the left, and add some spacing to the right of the first letter.

When you open this HTML file in a web browser, you will see that the first letter of the paragraph has special styles applied using the `::first-letter` pseudo-element, while the rest of the text remains in its default style. This demonstrates how to use `::first-letter` to style the first letter of a block-level element.

**5. ::selection:** It targets the portion of text that is selected by the user, allowing you to customize the appearance of selected text.

**Example : **

The `::selection` pseudo-element is used to style the selected text within an HTML document. You can change the background color, text color, and other properties of the selected text. Here’s an example of how to use `::selection` in HTML and CSS:

```xml
<!DOCTYPE html>
<html>
<head>
    <style>
        /* Define the ::selection styles */
        ::selection {
            background-color: #ff6600; /* Change the background color of the selected text */
            color: white; /* Change the text color of the selected text */
        }

        /* CSS styles for the paragraph */
        p {
            width: 300px;
            background-color: #336699;
            color: white;
            padding: 10px;
            font-size: 16px;
        }
    </style>
</head>
<body>
    <h2>::selection Example</h2>
    <p>Select some text within this paragraph to see the ::selection styles in action. The selected text will have a different background color and text color.</p>
</body>
</html>Code language: HTML, XML (xml)
```

**Output : **

![](https://blogkhanwaseem.s3.amazonaws.com/uploads/2023/09/18121336/image-136.png)

**In this example:**

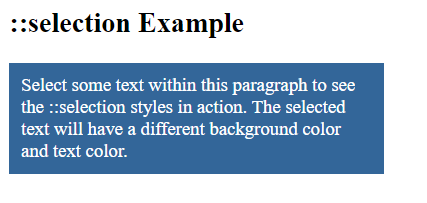
- We define the `::selection` pseudo-element styles using the `::selection` selector. Here, we change the background color to `#ff6600` (orange) and the text color to white for the selected text.

- We also set the default styles for the paragraph (`<p>`) element, including its dimensions, background color, text color, padding, and font size.

When you open this HTML file in a web browser and select text within the paragraph, you will see that the selected text has a different background color and text color, as specified by the `::selection` styles. This demonstrates how to use `::selection` to style the selected text in an HTML document. Please note that browser support for `::selection` may vary, and some older browsers may have limited support or require vendor prefixes.

**6. ::placeholder:** Specifically used for input and textarea elements, this pseudo-element styles the placeholder text that appears when the input is empty.

**Example : **

The `::placeholder` pseudo-element is used to style the placeholder text of input and textarea elements. Placeholder text is the text that appears in an input field or textarea to provide a hint or description of what should be entered. Here’s an example of how to use `::placeholder` in HTML and CSS:

```xml
<!DOCTYPE html>
<html>
<head>
    <style>
        /* CSS styles for the input element */
        input[type="text"] {
            width: 300px;
            padding: 10px;
            font-size: 16px;
        }

        /* Style the placeholder text */
        input[type="text"]::placeholder {
            color: #999; /* Change the color of the placeholder text */
            font-style: italic; /* Make the placeholder text italic */
        }
    </style>
</head>
<body>
    <h2>::placeholder Example</h2>
    <input type="text" placeholder="Enter your name">
</body>
</html>Code language: HTML, XML (xml)
```

**Output : **

![](https://blogkhanwaseem.s3.amazonaws.com/uploads/2023/09/18121649/image-137.png)

**In this example:**

- We have an `<input>` element of type “text” that serves as a text input field.

- In the CSS, we set the default styles for the input field, including its width, padding, and font size.

- We use the `input[type="text"]::placeholder` selector to style the placeholder text of the input field. In this case, we change the color of the placeholder text to a grayish color (#999) and make it italic using `font-style`.

When you open this HTML file in a web browser, you will see the input field with placeholder text. The placeholder text will be styled according to the `::placeholder` styles you defined in the CSS. This demonstrates how to use `::placeholder` to style the placeholder text of input and textarea elements.

Pseudo-elements are valuable for adding decorative elements, improving typography, or enhancing user interfaces without the need for additional HTML elements. They provide a convenient way to create visually appealing and interactive web designs.

### Related posts:

[CSS – Pseudo Classes](https://blog.khanwaseem.com/css-pseudo-classes/)
[CSS – Text](https://blog.khanwaseem.com/css-text/)
[CSS – Table](https://blog.khanwaseem.com/css-table/)
[CSS – @ Rules](https://blog.khanwaseem.com/css-rules/)

Powered by [YARPP](https://yarpp.com).
