---
title: "CSS – Padding"
url: https://khanwaseem.com/blog/course/css-padding
author: "khan Waseem"
published: 2023-09-15
updated: 2023-09-15
topics: ["course", "CSS Tutorial"]
description: "Explore a world of knowledge with expert insights on a wide range of topics. Stay informed and inspired with our curated content."
---

# CSS – Padding

In CSS, “padding” is a fundamental concept used to control the space between the content of an HTML element and its border. It’s like adding cushioning or space inside an element. Paddings can be applied to various HTML elements, such as text, images, and containers, to control the spacing between the content and the edges of the element.

You can set padding values for an element using CSS properties like `padding-top`, `padding-right`, `padding-bottom`, and `padding-left`, or you can use the shorthand property `padding` to set all four values at once.

Here’s a brief explanation of how padding works:

- **`padding-top`**: Specifies the amount of space between the content and the top edge of the element.

- **`padding-right`**: Determines the space between the content and the right edge of the element.

- **`padding-bottom`**: Sets the space between the content and the bottom edge of the element.

- **`padding-left`**: Controls the space between the content and the left edge of the element.

- **`padding`**: The shorthand property for setting all four paddings in one declaration. You can specify padding values in various units, such as pixels, percentages, or ems.

In CSS, the `padding` property is used to add space between the content of an element and its borders. You can specify different values for padding on each side of an element (top, right, bottom, left) or use shorthand to set padding for all sides at once. Here’s an example of how to use the `padding` property in HTML:

```xml
<!DOCTYPE html>
<html>
<head>
    <style>
        /* CSS styles for the div element */
        .padding-div {
            width: 200px;
            height: 100px;
            background-color: #336699;
            padding: 20px; /* Apply 20px padding to all sides */
        }

        /* CSS styles for the div element with different padding values */
        .custom-padding-div {
            width: 200px;
            height: 100px;
            background-color: #ff6633;
            padding-top: 10px; /* 10px padding on the top */
            padding-right: 30px; /* 30px padding on the right */
            padding-bottom: 15px; /* 15px padding on the bottom */
            padding-left: 5px; /* 5px padding on the left */
        }
    </style>
</head>
<body>
    <h2>Element with Uniform Padding</h2>
    <div class="padding-div">This div has uniform padding.</div>

    <h2>Element with Custom Padding</h2>
    <div class="custom-padding-div">This div has custom padding on each side.</div>
</body>
</html>Code language: HTML, XML (xml)
```

**Output : **
![](https://blogkhanwaseem.s3.amazonaws.com/uploads/2023/09/15134823/image-97.png)

**In this example:**

- We have two `<div>` elements, each with a different set of padding styles.

- The first `<div>` with the class `.padding-div` applies uniform padding of `20px` to all sides, creating space between the content and the border.

- The second `<div>` with the class `.custom-padding-div` applies custom padding values for each side: `10px` on the top, `30px` on the right, `15px` on the bottom, and `5px` on the left.

You can adjust the padding values to achieve the desired spacing for your HTML elements.

Table of Contents

[Toggle](#)

- [CSS Paddings – Shorthand Property](#css-paddings-%e2%80%93-shorthand-property)
- [CSS Paddings – Set Three Values](#css-paddings-%e2%80%93-set-three-values)
- [CSS Paddings – Set Two Values](#css-paddings-%e2%80%93-set-two-values)

## CSS Paddings – Shorthand Property

Of course, I can provide an explanation of the CSS padding shorthand property in a more human-readable format.

In CSS, the padding shorthand property allows you to set the padding for an element’s four sides (top, right, bottom, and left) in a single declaration, providing a more concise way to control spacing.

Here’s how it works:

```css
/* Using the padding shorthand property */
element {
  padding: top-value right-value bottom-value left-value;
}Code language: CSS (css)
```

- **top-value**: Specifies the padding for the top side of the element.

- **right-value**: Determines the padding for the right side of the element.

- **bottom-value**: Sets the padding for the bottom side of the element.

- **left-value**: Controls the padding for the left side of the element.

You can use different units for the values, such as pixels (px), percentages (%), ems (em), or other supported units. Additionally, you can set different values for each side or use fewer values to apply the same padding to multiple sides.

For example:

```xml
<!DOCTYPE html>
<html>
<head>
    <style>
        /* CSS styles for the div element with shorthand padding */
        .padding-div1 {
            width: 200px;
            height: 100px;
            background-color: #336699;
            padding: 20px 30px 40px 10px; /* Apply padding values for top, right, bottom, left */
        }       
    </style>
</head>
<body>
    <h2>Element with Shorthand Padding in one line</h2>
    <div class="padding-div1">This div has padding specified using the shorthand 'padding' property.</div>
</body>
</html>
Code language: HTML, XML (xml)
```

**Output : **
![](https://blogkhanwaseem.s3.amazonaws.com/uploads/2023/09/15141219/image-99.png)

**In this example : **

- `.padding-div1`: This is a CSS class selector used to target a `<div>` element with the class `padding-div1`.

- `padding`: This property sets the padding for all four sides (top, right, bottom, left) of the `<div>` in a single line. The values `20px 30px 40px 10px` represent the padding values for each side in the following order: top (20px), right (30px), bottom (40px), and left (10px).

The padding shorthand property simplifies the process of setting padding values for elements and is a handy tool for achieving precise spacing and layout control in your web design.

## CSS Paddings – Set Three Values

In CSS, when you want to apply padding to an element with just three values, you are specifying padding for the top, right/left, and bottom sides, in that order. Here’s how it works:

```css
/* Setting three padding values */
element {
  padding: top-value right/left-value bottom-value;
}Code language: CSS (css)
```

- **top-value**: This value determines the padding for the top side of the element.

- **right/left-value**: You provide one value for both the right and left sides of the element.

- **bottom-value**: This value sets the padding for the bottom side of the element.

**Example : **

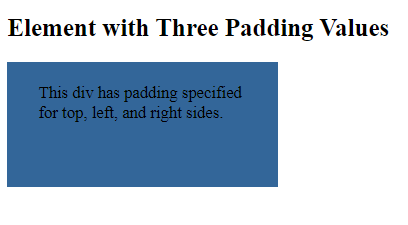
In CSS, you can set three padding values for an element using the `padding` property. These values apply to the top, left, and right sides, with the bottom padding being the same as the top. Here’s an example in HTML:

```xml
<!DOCTYPE html>
<html>
<head>
    <style>
        /* CSS styles for the div element with three padding values */
        .padding-div {
            width: 200px;
            height: 100px;
            background-color: #336699;
            padding: 20px 30px 0; /* Apply padding values for top, left, and right (bottom will be the same as top) */
        }
    </style>
</head>
<body>
    <h2>Element with Three Padding Values</h2>
    <div class="padding-div">This div has padding specified for top, left, and right sides.</div>
</body>
</html>Code language: HTML, XML (xml)
```

**Output : **

![](https://blogkhanwaseem.s3.amazonaws.com/uploads/2023/09/15141928/image-100.png)

**In this example:**

- We have a `<div>` element with the class `.padding-div`.

- In the CSS, we use the `padding` property to set three padding values: `20px` for the top, `30px` for the left, and `0` for the right. Since we haven’t specified a value for the bottom, it will automatically be the same as the top, creating padding only on the top, left, and right sides.

This results in the `<div>` element having padding on its top, left, and right sides, but no padding on the bottom. You can adjust these values as needed to control the spacing for your HTML elements.

You can use various units (like pixels, percentages, ems, etc.) for these values, depending on your design needs. This approach is useful when you want to maintain consistency in the padding for the left and right sides of an element while customizing the padding for the top and bottom. It’s a practical way to control the spacing and layout of elements in your web design.

## CSS Paddings – Set Two Values

In CSS, when you want to apply padding to an element with two values, you are specifying padding for the top/bottom and right/left sides, in that order. Here’s how it works:

```css
/* Setting two padding values */
element {
  padding: top/bottom-value right/left-value;
}Code language: CSS (css)
```

- **top/bottom-value**: This value determines the padding for the top and bottom sides of the element.

- **right/left-value**: This value sets the padding for the right and left sides of the element.

**Example : **

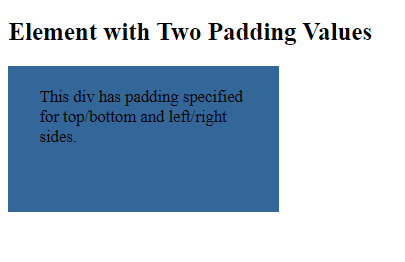
In CSS, you can set two padding values for an element using the `padding` property. These values apply to the top/bottom and left/right sides. Here’s an example in HTML:

```xml
<!DOCTYPE html>
<html>
<head>
    <style>
        /* CSS styles for the div element with two padding values */
        .padding-div {
            width: 200px;
            height: 100px;
            background-color: #336699;
            padding: 20px 30px; /* Apply padding values for top/bottom and left/right */
        }
    </style>
</head>
<body>
    <h2>Element with Two Padding Values</h2>
    <div class="padding-div">This div has padding specified for top/bottom and left/right sides.</div>
</body>
</html>Code language: HTML, XML (xml)
```

**Output : **

![](https://blogkhanwaseem.s3.amazonaws.com/uploads/2023/09/15154737/image-101.png)

In this example:

- We have a `<div>` element with the class `.padding-div`.

- In the CSS, we use the `padding` property to set two padding values: `20px` for the top and bottom and `30px` for the left and right. These two values are separated by a space, and they apply to the top/bottom and left/right sides of the `<div>`, respectively.

This results in the `<div>` element having padding on its top and bottom sides (20 pixels each) and padding on its left and right sides (30 pixels each). You can adjust these values as needed to control the spacing for your HTML elements.

You can use various units (like pixels, percentages, ems, etc.) for these values, depending on your design needs. This approach is useful when you want to maintain consistency in the padding for the top and bottom while customizing the padding for the right and left sides of an element. It’s a practical way to control the spacing and layout of elements in your web design, especially when you want equal padding on opposite sides.

### Related posts:

[CSS – Margin](https://blog.khanwaseem.com/css-margin/)
[CSS – Position](https://blog.khanwaseem.com/css-position/)
[CSS – Border](https://blog.khanwaseem.com/css-border/)
[CSS – Pseudo Classes](https://blog.khanwaseem.com/css-pseudo-classes/)

Powered by [YARPP](https://yarpp.com).
