---
title: "Authentication in Next.js"
url: https://khanwaseem.com/blog/course/authentication-in-next-js
author: "khan Waseem"
published: 2023-11-11
updated: 2026-11-22
topics: ["course", "Nextjs Tutorial"]
description: "Introduction: A crucial component of web development is authentication, which ensures users’ individualized and safe experiences. Implementing user authentication in Next.js, a popular React framework, includes a…"
---
# Authentication in Next.js
Table of Contents
[Toggle](#)
- [Introduction:](#introduction)[What is Authentication?](#what-is-authentication)
- [Implementing User Authentication:](#implementing-user-authentication)
- [1. Local Authentication:](#1-local-authentication)[2. Session Management:](#2-session-management)
- [Using Third-Party Authentication Providers:](#using-third-party-authentication-providers)
- [1. NextAuth.js Integration:](#1-nextauthjs-integration)
- [2. Adding Authentication Buttons:](#2-adding-authentication-buttons)
- [Protecting Routes and Resources:](#protecting-routes-and-resources)[1. Authenticated Routes:](#1-authenticated-routes)
- [2. Usage in Pages:](#2-usage-in-pages)
- [Conclusion :](#conclusion)
## Introduction:
A crucial component of web development is authentication, which ensures users’ individualized and safe experiences. Implementing user authentication in Next.js, a popular React framework, includes a variety of solutions, including basic username/password `authentication `to using third-party vendors. We’ll dive into the complexities of creating user `authentication`, integrating third-party `authentication `providers, and protecting routes and resources in a Next.js application.
### What is Authentication?
In Next.js, authentication is the process of confirming a user’s identity when they access a web application that was developed using the Next.js framework. Ensuring that only authorized users can access specific features, pages, or resources within the application is a key security safety.
Next.js is a React framework that allows developers to easily create server-rendered React applications. While Next.js offers a basis for online application development, proper authentication typically requires the usage of many authentication techniques and tools.
### Implementing User Authentication:
### 1. Local Authentication:
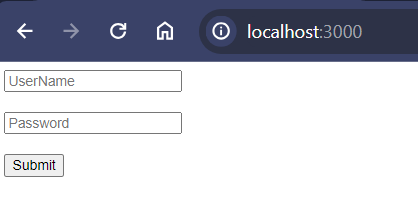
Handling user credentials within your program is known as local `authentication`. Here’s a simplified example that makes use of Next.js and a virtual `authentication `service:
```xml
// components/LoginForm.js
import React, { useState } from 'react';
const LoginForm = () => {
const [username, setUsername] = useState('');
const [password, setPassword] = useState('');
const handleLogin = async () => {
// Implement authentication logic here
// For example, send a request to your authentication API
};
return (
setUsername(e.target.value)}
/>
setPassword(e.target.value)}
/>
);
};
export default LoginForm;Code language: HTML, XML (xml)
```
**Output : **
#### 2. Session Management:
After a user has been authorised, it is critical to manage their session. The **useSession **hook in Next.js makes it simple to manage sessions on the client side:
```xml
// pages/dashboard.js
import { useSession } from 'next-auth/react';
const Dashboard = () => {
const { data: session } = useSession();
if (!session) {
// Redirect to login if not authenticated
return
Please log in to access the dashboard.
;
}
return (
Welcome, {session.user.name}!
{/* Dashboard content */}
);
};
export default Dashboard;
Code language: HTML, XML (xml)
```
Make sure the component you’re using with **useSession **is inside a parent component that has the **SessionProvider **wrapped around it. Here your Example :
```javascript
import { SessionProvider } from "next-auth/react";
import Dashboard from "./Component/Dashboard ";
export default function Home() {
return (
<>
)
}
Code language: JavaScript (javascript)
```
**Output : **
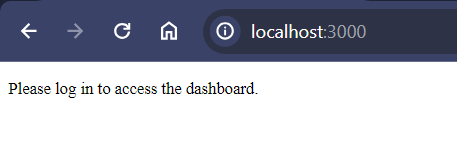
This JavaScript code replicates the functionality of the original JSX/React example you provided. It checks if the user is authenticated using the **useSession **hook from **next-auth/react**. If it does not, it shows a message asking the user to log in. If the user is authenticated, it displays a welcome message as well as the user’s name. The actual dashboard content can be added within the `div` where it says “Dashboard content.”
### Using Third-Party Authentication Providers:
### 1. NextAuth.js Integration:
NextAuth.js simplifies integrating with various `authentication `providers. Install it and set up a basic configuration:
```bash
npm install next-authCode language: Bash (bash)
```
```xml
// pages/api/auth/[...nextauth].js
import NextAuth from 'next-auth';
import Providers from 'next-auth/providers';
export default NextAuth({
providers: [
Providers.Google({
clientId: process.env.GOOGLE_CLIENT_ID,
clientSecret: process.env.GOOGLE_CLIENT_SECRET,
}),
// Add other providers as needed
],
});
Code language: HTML, XML (xml)
```
### 2. Adding Authentication Buttons:
Implement `authentication `buttons in your application, linking to the appropriate provider:
```xml
// components/AuthButtons.js
import { signIn } from 'next-auth/react';
const AuthButtons = () => {
return (
{/* Add buttons for other providers */}
);
};
export default AuthButtons;
Code language: HTML, XML (xml)
```
### Protecting Routes and Resources:
#### 1. Authenticated Routes:
Create a higher-order component (HOC) to protect routes that require `authentication`:
```xml
// components/ProtectedRoute.js
import { useSession } from 'next-auth/react';
import { useRouter } from 'next/router';
const ProtectedRoute = ({ children }) => {
const { data: session } = useSession();
const router = useRouter();
if (!session) {
// Redirect to login if not authenticated
router.push('/login');
return null;
}
return <>{children};
};
export default ProtectedRoute;
Code language: HTML, XML (xml)
```
#### 2. Usage in Pages:
Apply the **`ProtectedRoute` **component to secure specific pages:
```xml
// pages/dashboard.js
import ProtectedRoute from '../components/ProtectedRoute';
const Dashboard = () => {
return (
Authenticated Dashboard
{/* Dashboard content */}
);
};
export default Dashboard;
Code language: HTML, XML (xml)
```
## Conclusion :
Next.js provides a solid framework for enabling user `authentication`, whether through internal or outside suppliers. You may improve security and streamline the `authentication `process by using NextAuth.js. Also, securing routes and resources ensures that only authenticated users have access to sensitive data. Use the examples and ideas provided to improve the `authentication `experience in your Next.js applications, giving users secure and personalized interactions.
### Related posts:
[CSS – Table](https://blog.khanwaseem.com/css-table/)
[HTML – Tables](https://blog.khanwaseem.com/html-tables/)
[React Redux](https://blog.khanwaseem.com/react-redux/)
[CSS – Text](https://blog.khanwaseem.com/css-text/)
Powered by [YARPP](https://yarpp.com).